Wednesday, March 31, 2010

The Queen of Quiches

I seem to have become the Queen of Quiches lately.  It's almost like every event I'm catering, or weekend brunch I'm going to, I'm being asked to prepare a quiche of some sort.  It's not that I don't like quiche... I love quiche actually... it's just that I feel that I've written this blog entry about 2 other times... so I don't mean to bore or be drab... trust me I've got a lot more in my repertoire... but this is a request... and if you know me by now you know... I aim to please!  


So here is a delicious recipe for Spinach Quiche with Pancetta... it's one of my favorite quiches... take it from the Queen of all Quiches!   With Easter on Sunday, this is a great dish to serve to your family & friends. 


Spinach Pancetta Quiche


1 bag fresh spinach roughly chopped 
1/2 white onion finely diced
3 eggs
1/4 cup heavy cream
1/2 cup low fat ricotta cheese
1/4 cup low fat shredded cheese of your liking- I use Mozzarella & Gruyere for this quiche
3 Tablespoons finely diced Pancetta (Italian bacon that you can get in your Italian grocery store) 
Salt & Pepper


In a saute pan add the pancetta and cook until it's crispy.  Remove from the pan and set on a piece of paper towel to drain all of the excess grease.  In the same saute pan, add the onions and sweat them until they are translucent. Add the spinach and season with salt & pepper and allow to wilt... mix well with the onions.  Set aside, allow to cool. 


In a bowl combine the beaten eggs, cream, ricotta cheese and shredded cheese together.  Mix throughly. 


In a pie dish place the pie crust dough in it and follow directions per the box.  Add a layer of the cooked crispy pancetta, follow with the spinach & onion.  Pour the egg/cheese mixture over the top of the spinach and let it sit for a minute so that the egg can settle it's way down to the bottom of crust. 


Cook in the oven on 350 degrees for 45 minutes to an hour.   Serve warm.  Enjoy. 

Easter Egg EXTRAVAGANZA!!!!!


Easter is this Sunday, and most of you know that I"m pretty excited about it!  So alright, I found out that PEEPS aren't really one of your favorite things to eat over this holiday...but I am pretty darn sure no one has a complaint about this Easter tradition.  Dying Easter Eggs! 
I mean really, how can you not love it.  It's your chance to be as creative as you can be with after all what is just an egg.... and truly, for every child this is their BIG chance to get in the kitchen with mom or dad and make essentially their own Picasso!
I couldn't wait as a kid to get in there with my mom and bust open the box of PAAS dye and drop those little pellets into the vinegar water.  It smelled so bad but I loved to watch it bubble and the water slowly changed color to that lovely hue of blue black and how shocked I always was that when I took it out, it never quite looked the color I thought it would be. 


Here is a step by step to dying the perfect egg... and some tips and tricks I've picked up along the years... yes, I am qualified to call myself a professional egg dyer... ha ha ha. 


Preparation of the eggs for dyeing... 
Before decorating your eggs, you need to hard boil them.  About 12345 years ago (yes, I'm not revealing my age just yet) when I was in culinary school, the first lesson they taught us was how to boil an egg.  You didn't read wrong... I said, how to boil an egg.  Let me just say this... I didn't pass the first time, or the second or even the third.  I ate lots of eggs that day before I got it right!  So one might think to them self, is there a trick to boiling a perfect egg... well... yes and no. It's all about timing... and if you follow the guideline for time, you and your eggs will be just fine! 
First, place your eggs into your large saucepan or deep pot.  Add cold water, enough to completely cover the eggs.  Place the heat on high and bring the eggs to a gentle boil. Reduce heat to medium.  Allow to simmer for 12 minutes.  Remove from heat and run under cold water for 90 seconds.  In order to dye the eggs and get nice results, you have to wait until the eggs are completely cool and dry.  I suggest preparing your eggs the night before. 


So now let's get to the fun part!!! There are ton of ways that you can decorate your eggs!


The first being a traditional PAAS (most popular) Easter egg kit.  That was what we did for as long as I can remember! It came with 5 colors and 2 wax sticks and some wire looking thingie that was supposedly going to actually hold your egg and help you remove it, but somehow you always ended up using a spoon.  Nowadays, PAAS has over a dozen different types of kits! 


You can also make your own food color dye.  It's simple, its easy and it's relatively inexpensive.  It just requires some food coloring and 2 teaspoons of white distilled vinegar.  Combine in a bowl that's deep enough for the eggs, 1 tablespoon of food coloring with 2 teaspoons of the vinegar and fill about 1/2 way up the rest of the bowl with water.  Gently place the eggs into the cups.  The longer they're left in, the darker the color shade.  Mix it up and try different combos... try making different textures  by coloring on the egg with a crayon...try doing polka dots, swirls, lines and shapes.  
Rubber band eggs were also another one of my favorite kinds of eggs to decorate! Wrap elastic bands around the eggs as tight as you can (with out cracking them) and drop them into the dye.  Remove the egg after a few minutes and pat dry with a paper towel and allow them to dry for a few minutes.  Carefully remove the rubber bands see the cool design it makes. 
And then there's old faithful... if you can't find PAAS or don't want to use food coloring, you can go au naturale. 


Cold Dyes - Pink:

Mix 1 cup strained juice from canned beets,
½ teaspoon vinegar, and 3 cups water.
Soak cooled eggs in the dye for ½ hour.


Purple: 

Mix 1 cup purple grape juice, ½ teaspoon
vinegar, and 3 cups water. Soak
cooled eggs in the dye for ½ hour.


Boiled Dyes - Orange:

In a pot, mix 1 cup yellow onion skin (about 2 onions' worth), packed loosely, 1 teaspoon vinegar, and 3 cups water.
Boil mixture for ½ hour, cool to room temperature, strain out the onion skins, then add cooled eggs and soak them in the dye for ½ hour. 


Light Blue:

In a pot, mix 1 cup red cabbage leaves, torn and loosely packed, 1 teaspoon vinegar, and 3 cups water.
Boil mixture for ½ hour, cool to room temperature, strain out the cabbage leaves, then add cooled eggs and soak them in
the dye for ½ hour. 

Yellow:

In a pot, mix 1 teaspoon turmeric, 1 teaspoon vinegar, and 3 cups water.
Boil mixture for ½ hour, cool to room temperature, strain out stray turmeric grains, then add cooled eggs and soak them in the dye for ½ hour. 


I hope these tips and tricks inspire you to create some beautiful decorated eggs! Please feel free to send me your Easter pictures to michelle@foodfromthehearttv.com or post them on the facebook fan page! 

**sidenotes**
Some post Easter egg precautions to keep in mind: 


Storage time: In the shell, hard-cooked eggs can be refrigerated safely up to one week. Refrigerate in their original carton to prevent odor absorption. Once peeled, eggs should be eaten that day.


Food safety precaution: Piercing shells before cooking is not recommended. If not sterile, the piercer or needle can introduce bacteria into the egg. Also, piercing creates hairline cracks in the shell, through which bacteria can enter after cooking.


Never microwave eggs in shells. Steam builds up too quickly inside and eggs are likely to explode.


Hard-cooked eggs are best when you want a sturdy egg for hiding and when you want to eat them when you’re done. They are also easier for younger children to handle. 


Thursday, March 25, 2010

Carne Asade in a minute!

I love Carne Asada.  I love the smokey flavor of the meat... the spicy flavor from the Serrano chili  pepper... I think I can eat about a million of them in those small corn tortillas... yes. I said a million. 


This is an easy recipe...it's got a bit of ingredients, but there isn't too much prep to it!  Generally the longer you let the meat sit and marinate the better.  24 hours or overnight would be ideal, but if you can't wait that long- an hour will be just fine! 
Serve it with some salsa fresca, guacamole, chiles, or even sour cream... make tacos with it... burritos... it's all muy rico! 


Carne Asada

1 lb skirt steak or flank steak
Juice from 2 limes
1/4 cup olive oil
1/4 cup chopped cilantro
1 Serrano chiles minced 
1 garlic clove mined
1 tsp sugar
1/2 tsp Oregano (if you can find Mexican Oregano, even better)
1/2 tsp cumin
1 tablespoon Kosher salt
1/2 onion sliced
black pepper to tase
1 teaspoon liquid smoke

Combine all of the ingredients in a bowl and mix well.  Add steak to the mixture and allow to marinate for up to 24 hours. Remember, the longer the better! 


Cook it up on the grill and chop up into little cubes.  Serve with tortillas! MMMM!!!!


With the weather heating up, it's the perfect meal for the bbq and out doors! 

Hey party PEEPS! Interested in some S'MEEPS?


Easter isn't even here yet... but I'm getting antsy already!  The candy is starting to make an appearance!!!!

I’m going to sound a lot like my mother right now…something I swore I’d never do! But MAN OH MAN… KIDS NOWADAYS THEY’VE GOT IT MADE!   Why do they have it made you ask?  Oh, I’ll tell you!  No, it’s not that they have a cell phone at age 9… or the designer purses they’re carrying by 12…heck, it’s not even the new ipod they’re walking around with!  It’s the fact that nowadays… kids have my favorite Easter candy of ALL TIME available to them year round!!!

There were certain things I looked forward to every year as a child growing up…. Santa bringing all my Christmas presents… my birthday that followed two days after and of course Easter and those little sugary filled marshmallows in florescent yellow and pink called PEEPS! 

Oh my beloved PEEPS.  I mean it used to be that around 3 weeks before Easter we’d start seeing those displays of yellow packages wrapped in cellophane from floor to ceiling in the supermarkets… and I’d start bugging my mom saying “Please Mom! Can we buy PEEPS!” and she’d say, “wait till Easter honey, they’ll be in your Easter basket!”  and I literally could not wait for the day that I’d bite into those little chickadee heads and tear them off and taste those candy-coated bites with their crunchy exterior and creamy soft centers!

Did you know????

  • It takes 6 minutes to make one PEEPS chick.
  • Original PEEPS have a shelf life of 2 years!
  • PEEPS are the most popular non-chocolate Easter candy in the US.
  • Over 70 million PEEPS chicks lined up beak-to-tail are needed to reach from New York City to Los Angeles
  • PEEPS were born in 1940.
  • PEEPS chicks for Easter come in 6 festive colors! Yellow, Pink, Lavender, Blue, Orange & Green! (My favorite is Yellow!)

Think you can’t have a recipe with PEEPS??? Think again!  This one comes courtesy of Serious Eats Blog.  

S’MEEPS! A twist on the orignal recipe S’mores but with PEEPS! They’re my new Easter time favorite!  Let’s show these kids a thing or two about what kind of old school PEEPS we really are!

S’MEEPS

1 Package PEEPS
4 Graham Crackers, separated into 8 halves
Four 1-ounce squares semi sweet chocolate


Preheat your oven to 350 degrees.  Place a 1-oz square of chocolate on 4 of the graham cracker halves and top with a PEEP.  Place on an aluminum foil covered sheet pan and pop them in the oven for 2-3 minutes.  Watch them carefully as those little PEEPS will go burning up in flames in the blink of an eye!  Once the PEEPS have been melted or toasted to your liking, take them out of the oven and squish the other half of the graham cracker on top!  You will be in chickadee heaven!


So there you have it folks!  My ode to PEEPS.  They truly hold a special place in my heart and I can only hope they somehow make it into yours too!  You really don’t know what you’re missing out on ‘till you’ve tried a PEEPS!  

Allow me to leave you with a few more of my Easter favorites.... what's yours? 


And my personal favorite Easter joke... 


Happy Easter... Passover.... & Spring! 

Tuesday, March 23, 2010

Not so fried- fried chicken


Not so fried-fried chicken.....
Every now and then I get this major craving for fried chicken but know that I can do with out all of the extra calories!  Especially with summer time just around the corner, all of you that know me know how I like to watch my waistline! HA HA HA! NOT!   

All kidding aside, I’ve found a way to curb my craving but also have a moist on the inside crispy on the outside “fried-not-so-fried” chicken.

This recipe will probably take you about under 5 minutes in preparation, it’s that simple.  It requires a zip lock bag, a sheet pan and one casserole dish.  Yeah, that easy.  No deep fryers, heavy vats of oil and messy greasy spattered kitchen of grease!  Just your oven!
And I’m a sucker for anything that I can use a zip lock bag for while cooking! Less mess!

This one goes out to my reader Toni who pointed out… “just cause it’s food from the heart doesn’t mean it can’t be food FOR the heart!”

Fried-Not-Fried Chicken

3 Whole Boneless/Skinless Chicken Breasts
1 Cup Seasoned Breadcrumbs
(Add to the breadcrumbs a little additional salt & pepper and a dash of your favorite herb seasoning)
1 Egg beaten
1 Tbs. Milk
2 Tbs. Canola or Olive Oil

In a large zip lock bag put in the egg and the milk.  Kinda mush is around to combine the two.  Add the chicken breasts and let them sit in there for a few minutes.

On a sheetpan lined with wax paper or parchment paper mix your breadcrumbs and seasonings around and make an even layer.  Add your chicken breasts and coat both sides evenly, making sure to cover all of the breast with an ample layer of bread crumbs.


Move to a casserole dish that has been coated with a non-stick spray.  Drizzle the 2 tbs. of oil on the top of the breasts and put in the oven on 400 degrees uncovered for 35 minutes to 50 minutes depending on the thickness of your chicken breasts.

Remove from the oven and you have delicious, crispy fried-not-fried chicken!

**sidenote**
I happen to use boneless/skinless chicken breasts when making this recipe, but you can use any part of the chicken that you like… skin on or off.

You can sauté in a little pat of butter or olive oil some sliced mushrooms & a box of frozen artichoke hearts.  Season with some garlic salt or even some fresh thyme and it will make it’s own sauce and is a fantastic topping on your chicken for more added flavor!
Not so fried- fried chicken, mashed potatoes, asparagus & mushroom/artichoke saute


Friday, March 19, 2010

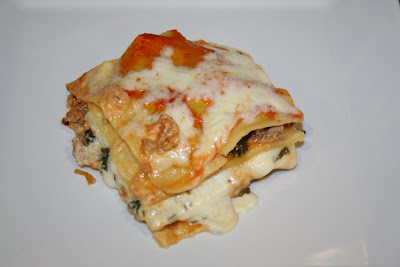
Lasagna.....


Lasagna is not nearly as difficult to make as you might think!  It just requires a bit of preparation and a few steps…. To me, it’s the ULTIMATE comfort food!  And if you’re lucky enough and live near a great Italian delicatessen that makes it’s own pasta noodles, or in this case Lasagna noodles… You’re in even more luck! 

This recipe is so light and flavorful, you just might finish the whole dish full, just like we did tonight!!!!

 Lasagna

1 lb fresh lasagna noodles or 1 box lasagna noodles
1 lb ground beef or turkey
1 large clove of garlic finely minced
½ onion finely chopped
1/4 cup heavy cream
2 tbs butter
1 large can plain tomato sauce or crushed tomatoes
1 teaspoon garlic salt
Salt & Pepper
Fresh Basil Chopped
Fresh Oregano
Fresh Parsley Chopped
1 8 oz container of Whole Milk or Low Fat Ricotta cheese
½ to 1 cup freshly shredded mozzarella cheese

Add the ground beef or turkey to a sauté pan.  Add onions, garlic, 1 teaspoon of butter, garlic salt and brown the meat. Add chopped parsley, oregano & basil to the meat for the last 2 minutes of cooking.  Set aside.

In a bowl combine Ricotta cheese, egg & shredded mozzarella mix well. Set aside.
You can add some fresh chopped spinach to your ricotta mixture too!

In a sauce pan add 1 clove of garlic, a drizzle of olive oil, 1 large can of tomato sauce, ½ cup heavy cream, fresh basil and mix well. Allow to simmer for 10 minutes.

Prepare Lasagna noodles according to the pacakage…

Now you can assemble!  It’s a lot of steps to get to this point… all easy of course!

Spray your pyrex or oven safe casserole dish with a non-stick spray.
Drizzle a teeny bit of olive oil on the bottom too for good measure!
Layer Lasagna, follow with a small amount of sauce just to cover the noodle- DON’T OVERSAUCE! The less sauce you use the better! Just enough to cover it. Add ground meat. Add another layer of noodles.  Then add the ricotta cheese mixture. Then another layer of noodles, sauce then meat.  Continue the same process till you get to the top of the dish! Top with some additional sauce. Bake in the oven COVERED for 45 min on 400 degrees.  Remove from the oven and take off the foil and top with some shredded mozzarella and bake for another 5-8 min until all cheese is melted and you’ve got some golden brown edges

Manga! Manga! 

Sunday, March 14, 2010

Susan G. Komen/American Women in Radio & Television/Dishes by Michelle Veggie Wraps


Today's blog is gonna sway from what I normally do, which is try to write fabulous recipes for all of you to create at home, but rather about an event that I catered today and my catering company dishes by michelle sponsored.  


The Susan G. Komen race for the Cure breast cancer walk.  I donated my services and food to the American Women In Radio & Television who were participating for the cure and wanted to share some of the photos with you... along with one GREAT recipe for delicious wraps that had everyone talking about how delicious they were!


Grilled Veggie Wraps

Flour or Whole Wheat Tortillas

1 Eggplant Sliced Thin and grilled on the bbq or in the oven
1 Zucchini Sliced Thin and grille on the bbq or in the oven   
(can drizzle some olive oil on them, salt & pepper and cook on broil in the oven for 3-5 min on each side)

Fresh Spinach
Alfalfa Sprouts
Sun Dried Tomatoes in Oil
Crumbled Feta Cheese

Basil Mayo
(Fresh Basil, Mayonaise, Pepper & a splash of balsamic in the blender... makes for a delectable spread)

Assemble
Spread 1 tsp. of Basil Mayo on the tortilla... layer the spinach, grilled veggies, sprouts, sundried tomatoes, & feta cheese on top... roll up like a burrito! Fold in the sides first, then roll up the rest! 

They are a seriously tasty veggie wrap! 


Oh, and for those of you that want to know what was on the menu... we had those great veggie wraps, fresh fruit salad in chinese food to go boxes, vanilla & strawberry yogurt with home made almond, cranberry, cinnamon granola on top, veggie chips, apples, bananas, oranges and some more of that delicious granola!  All great power food for everyone once they finished their walk! 


Check out the rest of the pictures.... I even got to walk all the bases on the field in Dodger Stadium, where the event took place!


Thank you American Women In Radio & Television and the Susan G. Komen Race for the Cure for allowing me to be a part of this special event that is so close to my heart!  Grandma Margaret & Aunty V... this was for you....