Friday, April 30, 2010

Soft Pretzels... not the one's from the mall!


I can't help it but when I go to the mall and I walk by one of those pretzel stands the wafting smell of butter and dough just sucks me in!  Anyone else know what I'm talking about?  
Well, here's a super simple recipe... if you wanna call it that... for some soft pretzels that are a little bit healthier for you cause they aren't dipped in that vat of "melted butter by product" and just a good ol' soft pretzel.  It's a process but well worth it. 
I happen to be a fan of them with some spicy brown mustard! :) 

Soft Pretzels

1 (.25 ounce) package active dry yeast
2 tablespoons brown sugar
1 1/8 teaspoons salt
1 1/2 cups warm water -(NOT HOT)
3 cups all-purpose flour
1 cup bread flour

2 cups warm water 
2 tablespoons baking soda

2 tablespoons butter, melted
2 tablespoons coarse kosher salt


In a large mixing bowl, dissolve the yeast, brown sugar and salt in 1 1/2 cups warm water. Stir in flour, and knead dough on a floured surface until smooth and elastic, about 8 minutes. Place in a greased bowl, and turn to coat the surface. Cover, and let rise for one hour.
  

Combine 2 cups warm water and baking soda in an pot.
  

After dough has risen, cut into 12 pieces. Roll each piece into a 3 foot rope, pencil thin or thinner. It will puff up! Twist into a pretzel shape... I realize that this is a lot easier said than done!  It's not that hard once you get the hang of it though... and you can even make little pretzel bites or twists... the shape doesn't matter too much! It's the taste!  Once you've made the shape that you want... dip into the baking soda solution.  It will puff up and expand.  Remove and place on parchment covered cookie sheets, and let rise 15 to 20 minutes.

Bake at 450 for 8 to 10 minutes, or until golden brown. Brush with melted butter or eat plain...  and sprinkle with coarse salt, garlic salt , cinnamon sugar, poppy seeds or sesame seeds... it's endless the toppings you can put on them!  Just go to the mall for some inspiration~! 


**sidenote**


When forming the ropes, roll each one to about half the length you want, then set it aside while you roll the rest. By the time you get back to the first rope, it will have rested enough to roll further

Tuesday, April 27, 2010

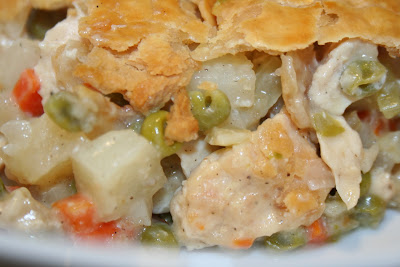
Yummy in your tummy Chicken Pot Pie!


Some days I just come home and all I crave is some good old comfort food.  Today was one of those days. Chicken Pot Pie was just what the doctor ordered!  This Chicken Pot Pie is savory, hearty & yummy in my tummy!  Yes... I'm beginning to sound like my 3 year old!  But it really is! 

I'll cut to the chase and let you know this straight away... You don't necessarily need to spend hours in the kitchen making pie crusts from scratch... nor making a flour roux... heck... you aren't even going to worry about baking it for hours.... this recipe is fairly simple and will have your family thinking you slaved away all day long for this meal!  (I like that thought... it makes them appreciate you more! ha ha ha!)  
Alright here it is...The YUMMY IN MY TUMMY RECIPE FOR CHICKEN POT PIE! 

Chicken Pot Pie

2 Potatoes peeled & cubed
2 Whole Carrots diced
4 Stalks of Celery diced
1/2 onion diced
1/2 cup frozen peas

1 package chicken breast tenderloins- cut into large dice
1/2 can Low Sodium Cream of Mushroom Soup
1/2 can Low Sodium Cream of Chicken Soup

1 box (2 sheets) of pie crust from the refrigerated section
Salt & Pepper to taste

Spray a casserole dish with some non-stick spray and lay one pie crust down.... spread up the sides of the dish.   
In a bowl combine Chicken, Potatoes, Carrots, Celery, Onion, Peas & cans of soup. Combine well. Pour into casserole dish.  

Take second pie crust and lay on top making sure to pinch the edges into the lower layer to make a seal.  Score the middle of the pie crust on top a few times to allow the steam to escape.  Brush the top with one beaten egg with a little water mixed in it.  Be sure to get the edges. 

Place in the oven on 375 for 1 hour and bake. 


**sidenotes**
Cream of Celery Soup is an excellent addition too!
Chop some mushrooms, broccoli or frozen corn is good in there too!  
Turkey Breast is a delicious sub for the chicken!

Tuesday, April 20, 2010

Something Sweet... Chocolate Strawberries & Whipped Cream... need I say more?


Somethin’ Sweet!

Sometimes I get this crazy insane craving for something sweet!  Ok, who am I kidding… it’s on a daily basis that I have a crazy insane craving for something sweet… but as we all know, I am NOT a baker, so it’s gotta be super simple. 

How does this sound… CHOCOLATE ANGEL FOOD CAKE with fresh whipped cream and strawberties!   Well, it sounds darn good to me!

And the best part is, it doesn’t require a whole lotta “baking” skill to make!

Chocolate Angel Cake

1 ¼ cups egg whites
¼ tsp. salt
1 tsp. cream of tartar
¾ cup granulated sugar
1 tsp vanilla extract
¾ cup flour (cake flour if you can)
½ cup granulated sugar
5 tbs. cocoa powder

Beat the egg whites until they are frothy… add the salt & cream of tartar.. continue to beat to soft peaks.  Gradually add in ¾ cup sugar… Add vanilla… continue to beat…in a bowl, sift the flour and cocoa and fold it into the egg white mixture.  Bake in an ungreased bundt pan on 325 degrees for 50 minutes to 1 hour…

**options**
Can add almond extract, lemon extract, coconut extract… play around with the flavors!

Now… let’s pump the brakes for a minute!  If you absolutely can’t get in the kitchen and bake… run on over to your local super market and they most likely will have some angel food cake already prepared… then jump on over to this next part and you’re almost in Chocolate Strawberry Heaven!


Whip the cream to stiff peaks


Slice your cake into 3 layers.... add a layer of whipped cream and top with strawberries... do the same with the following layer.... put the top layer on and enjoy!!!


YUM YUM YUM!!!!


Monday, April 19, 2010

Arroz Con Pollo


An Easy One Pot Basic Middle Of The Line Tasty On Any Weeknight Arroz con Pollo

Growing up in a middle eastern home our version of chicken with rice was completely on the flip side of what my husband’s was… so when I met him and we  just got married and he asked me to make him Chicken with Rice what he got and what he asked for were two totally different things!!!  Not too familiar with Latin style foods, I slowly over time learned what worked and what didn’t!   So what is Arroz con Pollo exactly???

Arroz con Pollo or “Chicken with Rice” is a traditional & classic Latin American dish.   There are as many different variations on how to make it as there are Latin countries… for instance, in Spain it might be traditional to add saffron to it, but in Peru they might add Corriander it.   Some have onions & peppers (mine do) and some have peas.  It’s a traditional common dish with a twist depending on where you are.

 I like to call this recipe for it “ an easy one pot basic middle of the line tasty on any weeknight Arroz con Pollo.”

Arroz Con Pollo

4 Boneless/Skinless Chicken Thighs (or a whole chicken in pieces if you prefer)
½  EACH Red, Yellow & Green Bell Pepper finely diced
½ onion diced
2 cloves of garlic minced
3 Tbsp Olive Oil

1 Package Goya Culantro-
 IF YOU CAN’T FIND IT…. 
-This basically is a mixture of  Turmeric, Corriander, Cumin, Anise, Pepper, Pimento & Garlic… the main flavor being the Turmeric… so just sub a little Turmeric if you can’t get your hands on a package of this.

½ can plain tomato sauce or 1 can petite dice tomatoes
2 cups long grain rice
3 cups chicken broth
½ cup dry white wine
½ cup water

fresh cilantro (optional)
salt & pepper

In a deep pan add 1 tbs. olive oil and sauté the peppers & garlic until the onion get a little golden.  Remove from the pan and set aside.  In the same pan add the chicken and cook until golden brown on each side.  Add peppers onion & garlic back in to pan. 

In a large measuring cup combine all liquids & seasoning packet then pour onto rice, chicken & peppers mixture.  Add tomatoes.  Cook on high heat until it comes to a boil and then reduce to a simmer and cover.  Cook for 35-40 minutes.  Uncover and allow to site for 5 minutes open before serving.


** OPTIONAL **
½ cup frozen peas
1 Tbs. chopped cilantro
A few threads of saffron
Chopped fresh parsley
For a little extra heat a diced fresh Jalapeno


Go ahead and experiment with this dish… it’s practically no fail and is a ONE PAN wonder!  Less mess, easy, delicious and good for you too!  It truly is a favorite in our house! 

Saturday, April 17, 2010

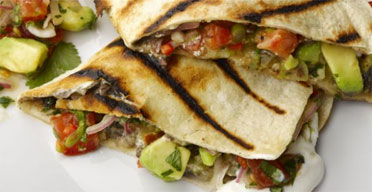
Saturday inspiration... Light. Easy. Veggie Quesadilla

Saturday is sometimes my most relaxing day... I get to take a minute while the kids are out playing or the house is quiet and read through my food magazines, peruse through my cookbooks and surf online  at all of the amazing cooking web pages there are out there... this one comes (photo and all) courtesy of allrecipes.com  It just looked so stinkin' delicious to me that I wanted to share it will all of you.  
What a fantastic idea for a light weekend lunch or even a fast weeknight dinner... pair it with one of my soup recipes... I'm thinking my "cream of vegetable" soup... and man, what a yummy meal that would be!  
I hope you enjoy this Vegetarian Quesadilla recipe... you know, you could always grill a piece or two of boneless skinless chicken breast that you marinate in some fresh chopped garlic, oregano, red pepper flakes & olive oil and throw it on the bbq or even in the oven and add it to this... yum yum yum! 


Yummy Vegetarian Quesadilla 

vegetarian lovers

Ingredients
        • 1/2 cup chopped red bell pepper
        • 1/2 cup chopped zucchini
        • 1/2 cup chopped yellow squash
        • 1/2 cup chopped red onion
        • 1/2 cup chopped mushrooms
        • 1 tablespoon olive oil
        • cooking spray
        • 6 (9 inch) whole wheat tortillas
        • 1 1/4 cups shredded reduced-fat sharp Cheddar cheese 
So this is where that recipe ends... but this is what I would add to it! :) 
        • 1/2 avocado diced
        • instead of the cheddar cheese... some fresh mozzarella would be delicious!
        • 1 tbs chopped cilantro or basil
        • a splash of balsamic 
Directions
In a large nonstick pan, cook red pepper, zucchini, yellow squash, onion, and mushrooms in olive oil over medium to medium-high heat for about 7 minutes, or until just tender. Remove vegetables from pan.
Coat the same pan with cooking spray, and place one tortilla in pan. Sprinkle 1/4 cup of cheese evenly over tortilla, and layer 3/4 cup of the vegetable mixture over the cheese. Sprinkle another 1/8 cup of cheese on the vegetables, and top with a second tortilla. Cook until golden on both sides, for approximately 2 to 3 minutes per side. Remove quesadilla from pan, and repeat with remaining ingredients. Cut each quesadilla into 8 triangles with a pizza cutter. Serve hot.

Friday, April 16, 2010

It's heating up... and I don't just mean the weather! A BBQ marinade that's delish!


Naturally  the weather warming up during spring & summertime means, outdoors, swimming pools, parties and BBQ’s. Here's a recipe for Michelle’s Famous (and yes, I do mean famous ha ha ha) Marinade! 
Think of this as yummy deliciousness in a bottle! You can use this on 


grilled beef, pork, chicken or fish as a marinade... or as a dip for 


breads & veggies...


So I hope you enjoy it and I can somehow be a part of your  BBQ-ing 


 memories!


Michelle's Marinade

1 bunch of curly or flat leaf parsley
4-6 cloves of garlic
1 whole or 1/2 large onion
1 whole green bell pepper
1/2 red bell pepper
1 tbs red pepper flakes
1 tbs garlic powder
1/4 cup white vinegar
1/2 cup oil (can use olive oil, canola, corn)
salt & pepper


OPTIONAL:
Fresh Cilantro, Fresh Rosemary, Fresh Jalepenos

Wash and roughly chop parsley, peppers, onion and other fresh herbs. Put all ingredients into the blender and pulse until everything is emulsified. Pulse to desired consistency. I usually blend it into a puree.
Pour onto your meat, fish or chicken and marinate for at least an hour. The longer you marinate it the more intense the flavor will be. Can marinate overnight for best flavor.

Thursday, April 15, 2010

Just some sliders....


Smokey Sliders
1 Pound Ground Beef, Turkey or Chicken
1 small can of Smoked Chilies
2 tablespoons Worcestershire sauce
1 teaspoon liquid smoke
¾ teaspoon garlic powder
½ teaspoon pepper

Combine all ingredients together in a bowl.
Pat into small patties and either cook in the oven on broil or make your life simple, throw them on your Foreman Grill!
Sauté some mushrooms!

Add some Avocados…. Blue Cheese dressing or make a great easy sauce with Ketchup, Mayonnaise & a couple dashes of hot sauce!